Showing posts with label pillow. Show all posts

Saturday, July 19, 2014

Combining patterns to make you stretch your crochet muscle

When you are first learning how to crochet, it feels like you have to stick to the easiest of patterns.  As you gain confidence, you may try more complicated designs.  I completely remember the first time I made the Divine Hat on Ravelry, the Flower Newsgirl Beanie by Polka Dot Posh, and the One Skein Lap Throw.  I felt fancy.  In retrospect, those patterns weren't too complicated, but there was counting involved and paying attention to how to place the hook to create the right stitch.  The best part was how accomplished I felt.

At some point, you gain enough confidence to start  playing.  By playing I mean going off the pattern or combining patterns.  I've been doing that for a while now; using one stitch for the body of a blanket and two or three border patterns to create something unique for the border.  It was pillow slip covers that really got me trying different things.  I made a flower pillow that combined a flower crocheted in the round, a pattern to change the round shape into a square, and then Cherry Heart's cushion back tutorial to finish up the slip cover.  I've written about the pillows here.

You can do this, too!  I've used Pinterest to collect a bunch of different patterns I like and thought about ways I could combine them.  One night, I found myself with quite a bit of yarn left from a Lacy Trellis blanket and thought I might try some of the patterns I had been pinning.  I love Dada's Place Primavera flower square and knew that I wanted to try it out.  Once I made one, I was hooked!  I made three more without even noticing how far I had gotten.  Then, after staring at the squares and wondering how I wanted to combine them, I went back to Pinterest and found a pin I had for a simulated braid join.  With a giant square created, I decided to turn it into a pillow.  I used a simple pattern to create stripes across the back and used Cherry Heart's cushion back tutorial to create the overlapping pieces for my pillow slip cover.

The result of all this experimentation and combination is this pillow.
From the front!

From the back.  Buttons hold the overlapping pieces together to secure the slip cover.


I'm in love with this pillow.  It will go perfectly with the blanket I made and it is seriously cheery.

Why don't you try something like this?  Pick two or more patterns you like and try combining them in a different way to make something unique.  It will stretch your crochet skills and make you feel super accomplished.  If you blog about them or post pictures somewhere, I hope you will share them!

Thursday, January 3, 2013

Spiral Flower Pillow Pattern - I'm a Crochet Ninja

A friend of mine called me a Crochet Ninja.  She has determined that there is nothing I can't figure out by looking at a picture and testing what I think works.  There's this pillow pattern on the Herrschners website.  It is called the Vintage Rose Pillow pattern.  It is beautiful.  This is the link, but it may or may not work.  Herrschners has done something with its website that messes with urls. Anyway, I am fascinated by this pillow pattern.  Rather than be individual rows of petals like my other pillow pattern, the design is a spiral and the petals spiral out from the center.  It is actually quite beautiful.  However, I'm not really interested in paying $19.99 for the kit,  even if it does come with the yarn.

So, I started testing. First, I crocheted a circle in spiral form.

Row 1: Magic Circle with Chain 2 and 12 DCs. Do NOT join.
Row 2: Starting in the top of the first DC from Row 1, in back loops only 2 DC in each stitch around. (24 DCs)
Row 3: In the back loops only, 2 DC, 1 DC, repeat around. (36 DCs)
Row 4: In the back loops only, 2 DC, 1 DC, 1 DC, repeat around (48 DCs)
Row 5: In the back loops only, 2 DC, 1 DC, 1 DC, 1 DC, repeat around (60 DCs)
Row 6: In the back loops only, 2 DC, 1 DC, 1 DC, 1 DC, 1 DC repeat around (72 DCs)
To finish my test, I did 2 DC in the next stitch, 1 HDC in the next stitch, 1 sc in the next stitch, a slip stitch in the next.  Fasten off and weave in ends.

Then, starting with the loops at the center of the circle, I made 2 HDC in one stitch, 3 DC in the next and repeated around the spiral for 2 rounds. Then I switched to 2 DC in one stitch, 3 DC in the next for the remainder of the spiral. The key to this pattern is that the petals are not too wavy, so 3 DC in every stitch is too many and makes the petals too wavy.  2DC then 3 DC seems to be the perfect combination.

I'll post pictures when I get some more yarn. I ran out of the color I was using.  :(

Sunday, June 17, 2012

Wiggle Crochet - Heart Pillow

I've recently discovered wiggle crochet.  It is this fantastic method where you crochet a grid and then crochet multiple stitches in each grid bar.  The effect is that you get this great wavy pattern.  The patterns are endless.

I got it in my head that I was going to design a heart pillow.  I created a 17x17 grid and used a spreadsheet document to plan out my pillow.  I'm so pleased with the results! I finished it the other day and it was destined to be my coworker's wedding gift.

The finished pillow


I just love the colors.  I used a lovely red in Red Heart Soft yarn and charcoal grey in Vanna's Choice.

Aren't the wiggles/waves gorgeous?
Side view with the back attached.

The back is wonderful too.  I used a granny square pattern I discovered on Ravelry that alternates FPDC and DC to create this great cabled look.
I'm so proud of my pillow!

Monday, May 7, 2012

My Flower Pillow Pattern

Here it is!  My pillow pattern.


If you make a pillow using my pattern, I hope you will share the link in the comments!  Enjoy!

Sunday, May 6, 2012

A Tale of Two Pillows

I love the cushion I made using Lucy's pattern from Attic24.


It's colorful happiness makes me so happy.

But the petals bother me.  They fold forward and don't really sit right.  I don't know why.  I suspect it may be due to an extra stitch between each of the petals.

A friend of mine asked me to make a pillow for her and I started one with Lucy's pattern. She wanted brilliant happy colors for her pillow and chose pink, turquoise, light green, purple, yellow, and aqua.  You can see that the pattern starts great in the center, but as it spreads out toward the ends, the petals flatten out and start doing strange things.

I ended up turning the circle into a square to create a square pillow.  For the back, I used Cherry Heart's back of cushion tutorial to create a fabulous back. The back is literally crocheted to the front panel about 3/4 of the way and then the second part is crocheted from the other end.  My friend asked for a lot of pink in the pillow, so I made the majority of the back the lovely bright pink color.

By the way, did you notice my birthday present to myself?  Isn't my new purple polka dot hook beautiful??


The color is a little off, but this is what the back looks like.  I just need to add the buttons and it is finished!

When I finished this pillow, I wondered if my original flower pillow pattern wouldn't work better.  So, I used my remaining yarn and created this pillow.


My version has a different way of increasing the circle and has one fewer stitch between petals.  Here's a view from above.

See how even the petals are?  They stay nice and loopy and don't flatten out as you get to the outside.  Now I just need to write up a pattern so that I never forget how I made this happy flower!

Monday, February 6, 2012

Flower Pillow #2

I created a flower pillow last year and I was very proud of it.  Lucy of Attic 24 has her own pattern and I decided that I wanted to try to do it on my own!  I decided I wanted a happy, bright colored pillow.  I had a bunch of 100% cotton yarn and decided to use it on my own flower pillow.

It started simply.  Fifteen double crochets, followed by a row of 30. 


Then, the petals.


As I went from row to row,


the flower began to take shape.


I used whatever color seemed the next logical to use.


Eventually, there were 10 rows of petals.

Finally, I crocheted a huge circle for the back and put in the pillow.

Isn't it lovely??

It is so bright and happy.  I just love looking at it!


Wednesday, June 1, 2011

Summer Garden Granny Square Pillow

So, there's this blog. It's written by Lucy. It's called "Attic 24."  I'm in love with it.  The colors.  The crochet.  It is all lovely.

A while ago, Lucy offered a pattern for her Summer Garden Granny Square.  I knew when I saw it that it was something special.  A few days ago, I decided to try it and I fell deeper in love.  I fell so much in love with the granny square that I decided to create a pillow (my current obsession).  The bonus:  It's my coworker, Alison's birthday tomorrow and it would make a great present for her. 

Just look at what I made:

See those Granny Squares?

These are the true colors.

Up close.

The back was a little different.

I'm so excited to see her fact tomorrow.  These pictures do not do this pillow any justice.  It is so lovely!

Saturday, April 16, 2011

Ever see something and think: I can make that?

Yesterday, Tangled Happy featured a rose pillow designed by the women over at Two Girls Being Crafty.  It is really cute, but their directions seemed rather unnecessarily involved.  In the post, they featured a picture of a pillow at Pier 1 that was their inspiration.   When I looked at that, I instantly knew how it had been made.  My brain would not shut off thinking about starting the pillow.

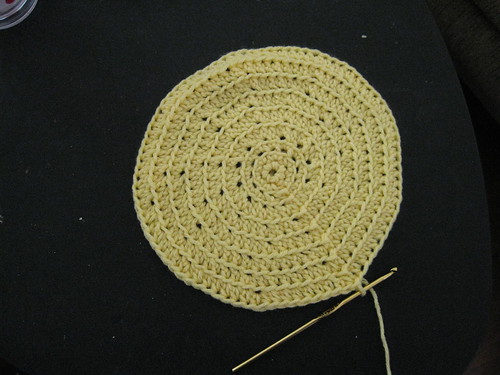
To make the rose/flower pillow, you need to make a circle.  Not just any circle, a really big circle.  Mine is over 12 inches in diameter.  I used a G hook and worsted weight yarn.

Row 1:  Chain 2 and crochet 6 sc into the the 2nd chain from the hook.  Sl st to complete the round and chain 1.

Row 2:  2 sc in each stitch to the end, sl st to complete the round.  Chain 1.
Row 3: *1 sc in next st in back loops only, 2 sc in next st in back loops only*.  Repeat to end  and sl st to complete round. Chain 1.
Row 4: *1 sc in the next 2 st in back loops only, 2 sc in the next st in back loops only* Repeat to end and sl st to complete round.  Chain 1.
Row 5: *1 hdc in next 3 st in back loops only, 2 hdc in next st in back loops only* Repeat to end and sl st to complete round.  Chain 1.

Continue each row using hdcs and taking care to crochet in back loops only.  In each consecutive row, increase the number of stitches with 1 hdc, followed by 2 hdc in the next st.

IMG_1628

My circle has a total of 10 rows.  At the end of your final round, sl st to complete round, fasten off.

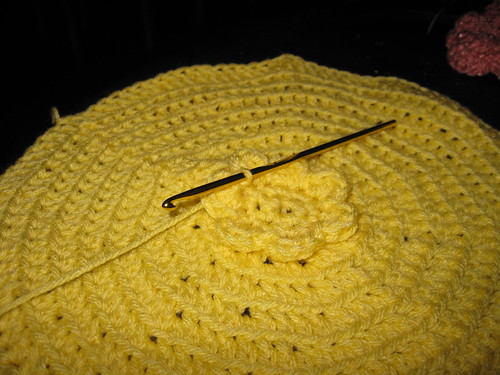
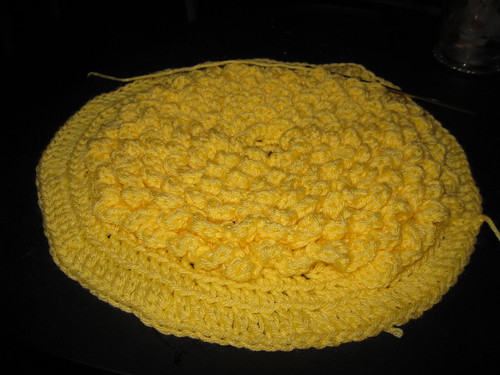
Petals, starting in the row of exposed front loops closest to the center.  Slip stitch in one of the loops and chain 2.  *Crochet 4 hdc in the same loop, sl st in next loop*, repeat to end.  Use this pattern in each row of front loops, sl st and fastening off at the end of the round.

IMG_1633

IMG_1638

I'm almost done with the petals.  Now all I need is a pillow to cover and to crochet the giant circle I will attach as the back to this one.  I plan to use the reverse sc to create a border where the two pieces are joined.

Check back soon!

UPDATE: And here it is!


It makes me so happy.  It sits on the chair next to my desk at work.